Sebastian's Biotech Bazaar
Golden Braid Modular Cloning Entry Vector Set
Golden Braid Modular Cloning Entry Vector Set
Couldn't load pickup availability
Everything you need to get started with Golden Braid Modular Cloning!
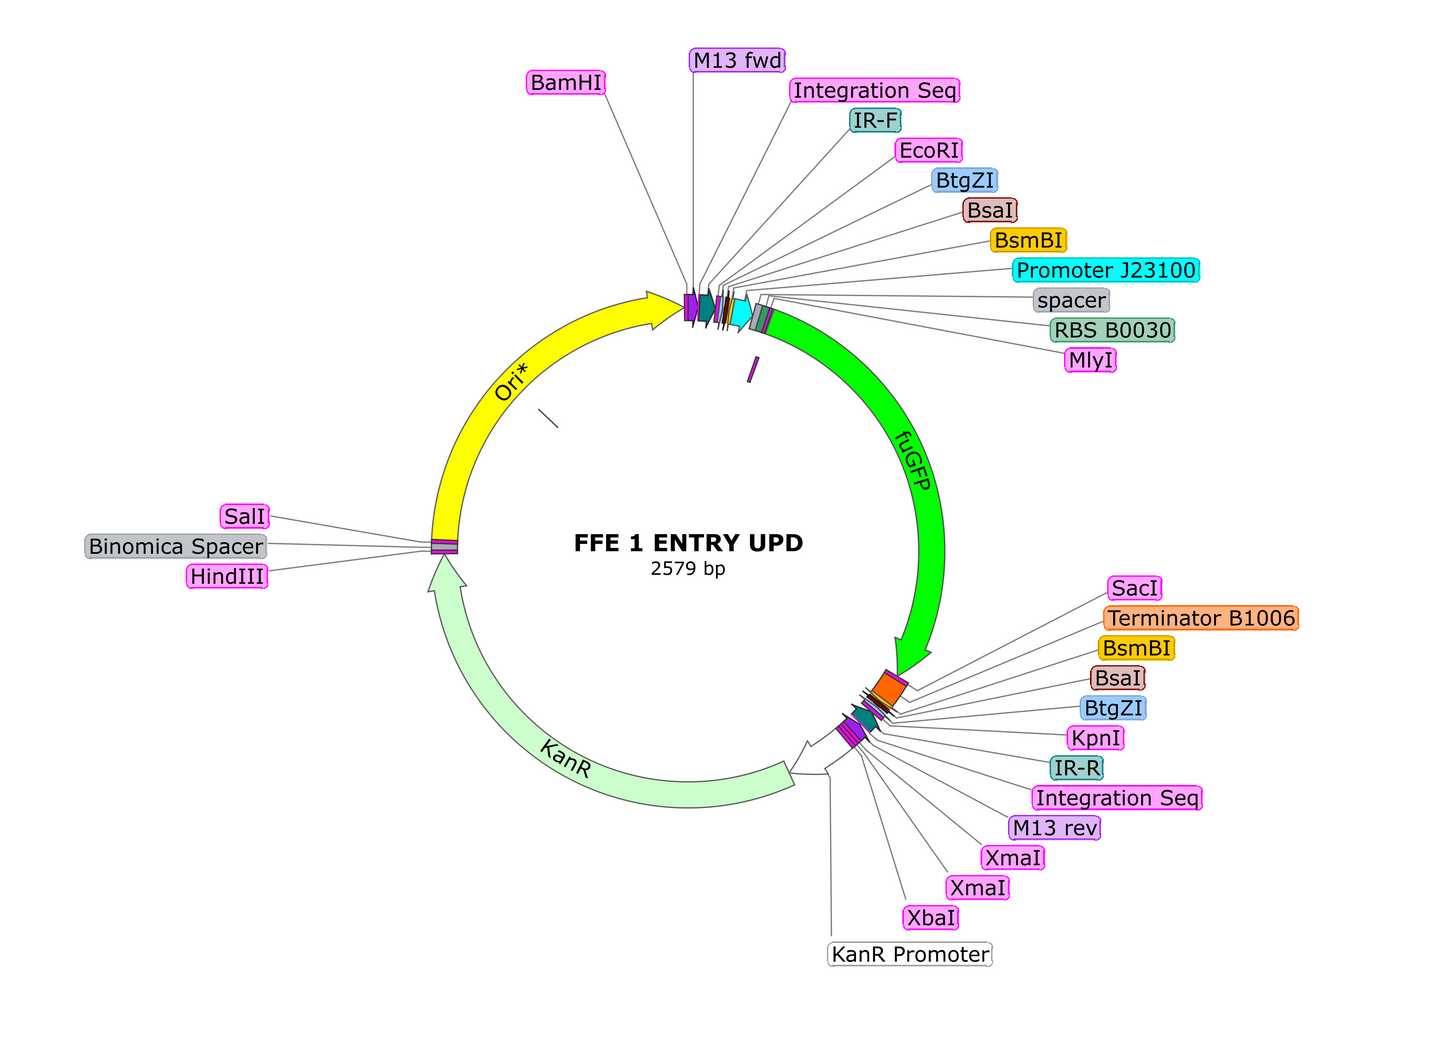
A collection entry vector plasmids for onboarding the popular Golden Braid modular cloning standard in your laboratory. These vectors allow for iterative addition of transcriptional units in an endless chain. The design also includes an FuGFP dropout cassette for easy identification of positive colonies. For a detailed tutorial, please follow the link at the bottom of this listing. In the meantime, here is a cheat sheet:
1. Domesticate your part of interest using primers which add the necessary cut sites and 4bp overhangs. Use the Part Domesticator Tool on the Golden Braid Pro website: Domestication formulary
2. Clone the resulting amplicons into the UPD (universal part domesticator) as follows:
-1uL of Entry Vector UPD
-6uL of purified PCR Product
-1uL 10x Cutsmart Buffer (NEB)
-1uL 10mM ATP
-0.5uL T4 DNA Ligase
-0.5uL Esp3I Restriction Enzyme (NEB; cheaper isoschizomer of BsmBI)
Use the following Golden Braid Construction protocol in your PCR machine overnight:
Initial Digest:
37C 60mins
25 Cut/Ligate Cycles:
37C 10mins
16C 10mins
Final Digest:
37C 60mins
Final Ligation:
50C 10min
Heat Kill Enzymes:
80C 10min
Cold Hold Until Ready:
13C
This construction protocol will be used for ALL golden braid reactions.
3. Transform the resulting ligation and select for non-fluorescent colonies on LB agar with 50mg/L Kanamycin. Miniprep the resulting plasmids, send them out for sequencing to ensure the part is verified, and add this tube to your library with corresponding labeling indicating part type.
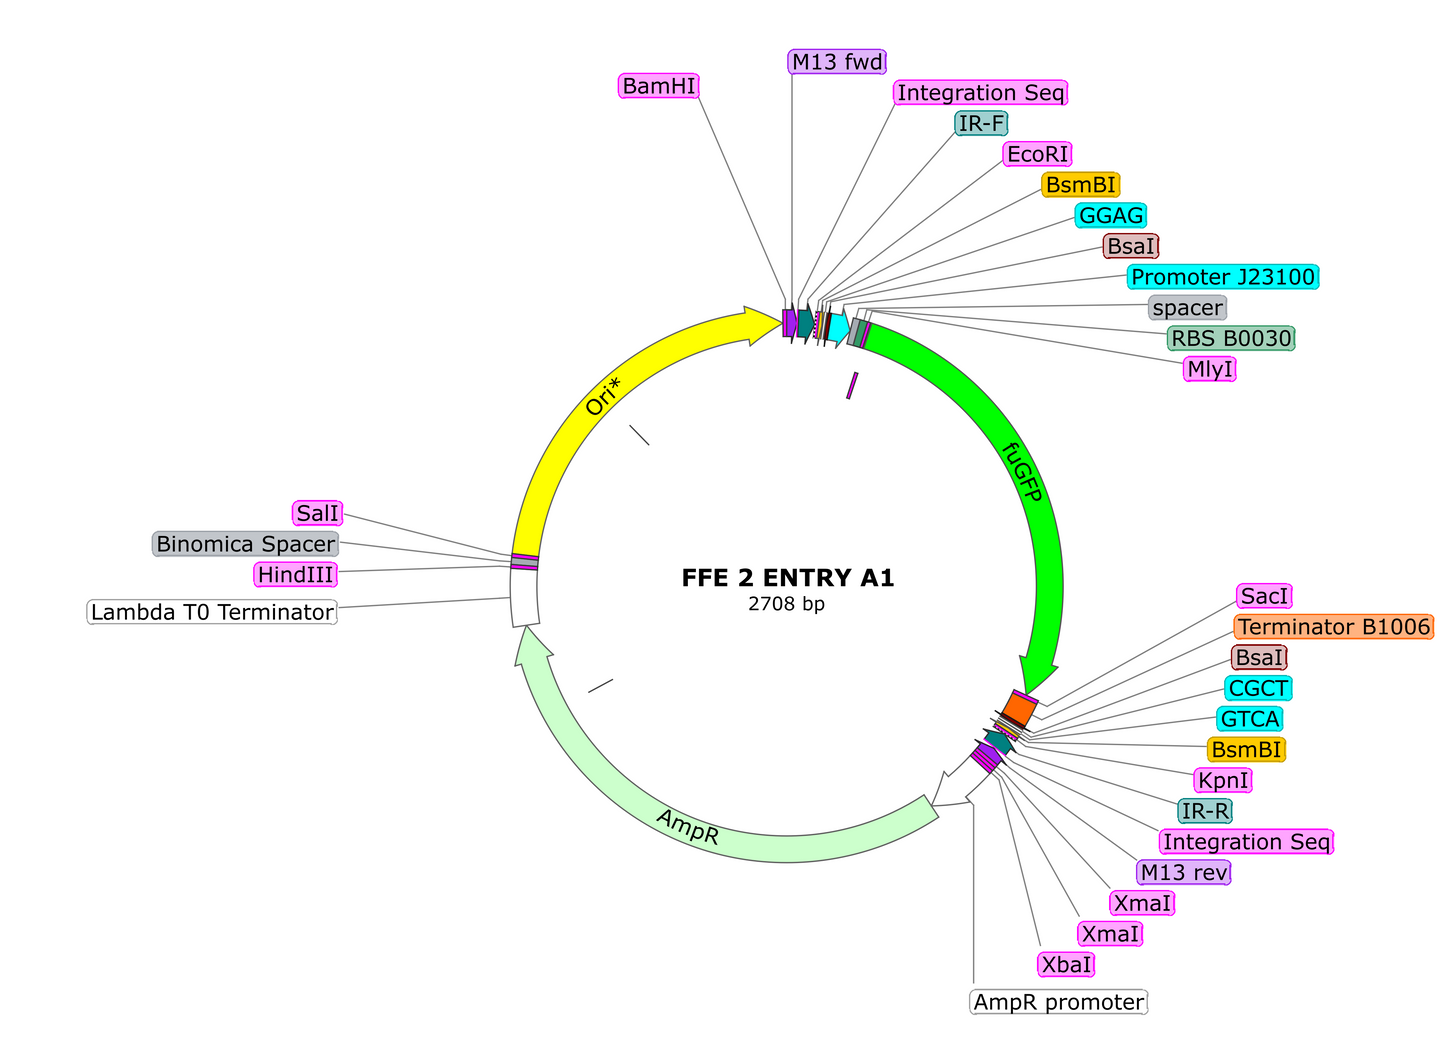
4. Once you've amassed a large enough collection of parts to start making transcriptional units (TU's), assemble your first Golden Braid reaction. In a single tube add the following:
-1uL of Entry Vector A1
-6uL of Mixture of Parts (equimolar if possible)
-Parts Should include Promoter, gene(s), and terminator such that 5' overhand of resulting TU is GGAG and 3' end is CGCT. This ensures it will clone in if ligated in designed order.
-I use 2.5uL of normalized miniprep (100ng/uL) of each part and vortex in a single PCR tube. This is my Mixture of Parts.
-1uL 10x Cutsmart Buffer (NEB)
-1uL 10mM ATP
-0.5uL T4 DNA Ligase
-0.5uL BsaI Restriction Enzyme (NEB)
Incubate this under a Golden Braid Construction Program in your PCR Machine overnight
5. The following day, transform 2.5uL of your ligation into 20uL of E. coli competent cells on LB with 100mg/L Ampicillin. NOTE THE CHANGE IN ANTIBIOTICS. Incubate at 37C overnight and select non-fluorescent colonies the following morning. PCR analyze for insert and send for sequencing to verify. Congratulations, you've made your first Golden Braid Transcription Unit!
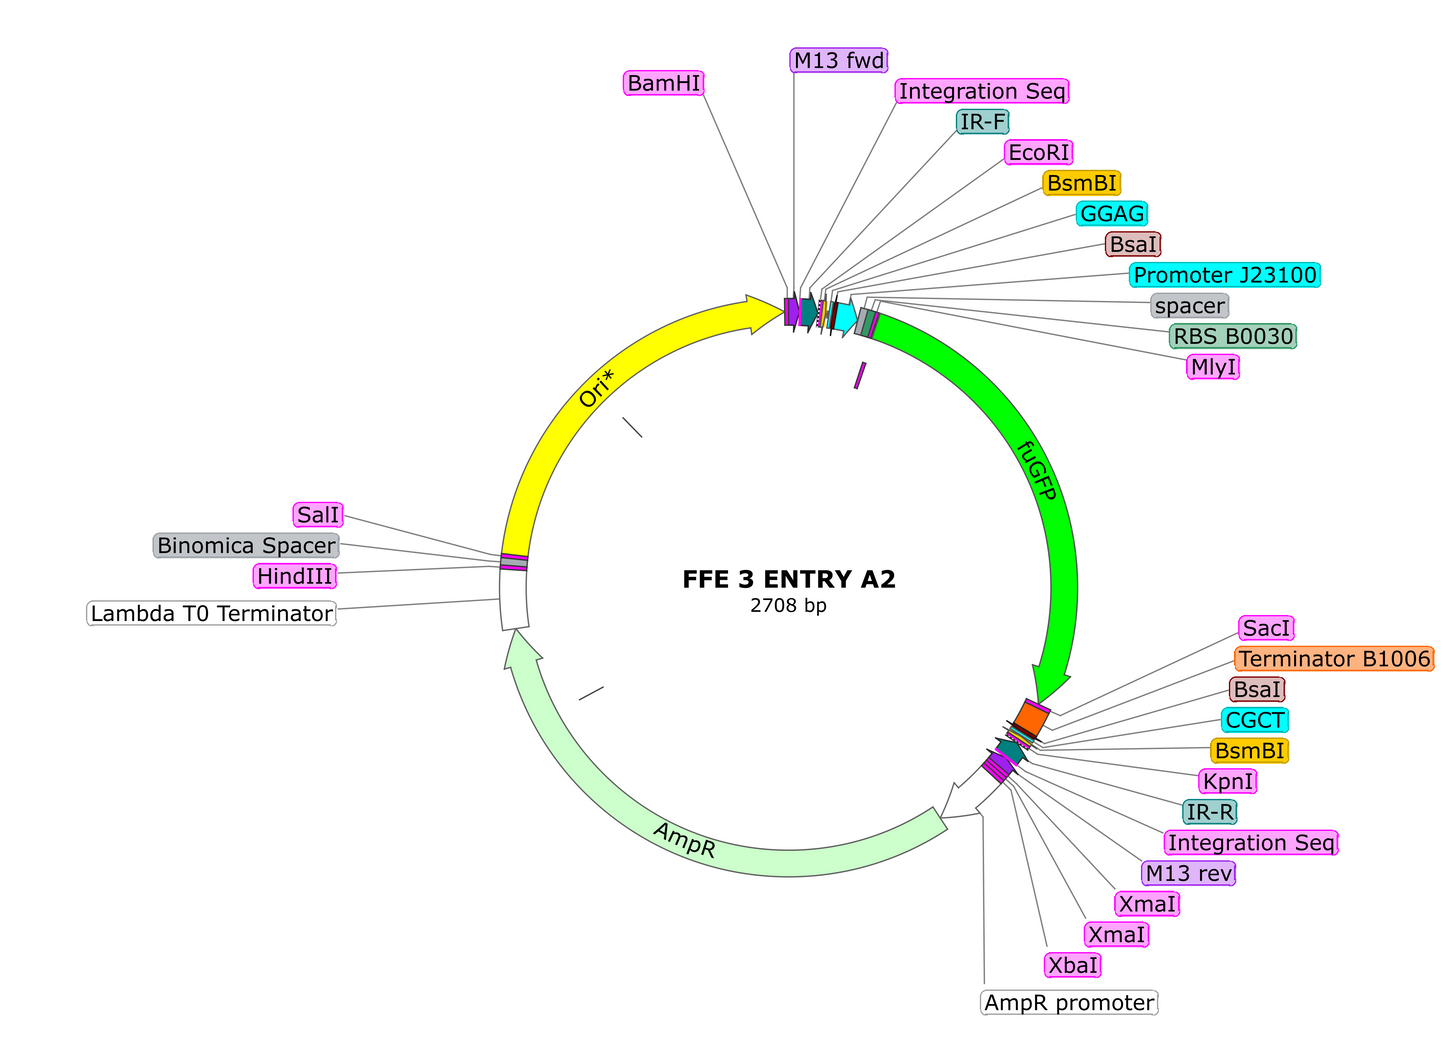
6. If you wish to chain transcription units together, assemble another TU but this time use Entry Plasmid A2 as the entry vector for the reaction. Clone, analyze, and sequence. Once this is done you are ready to chain the TU's together.
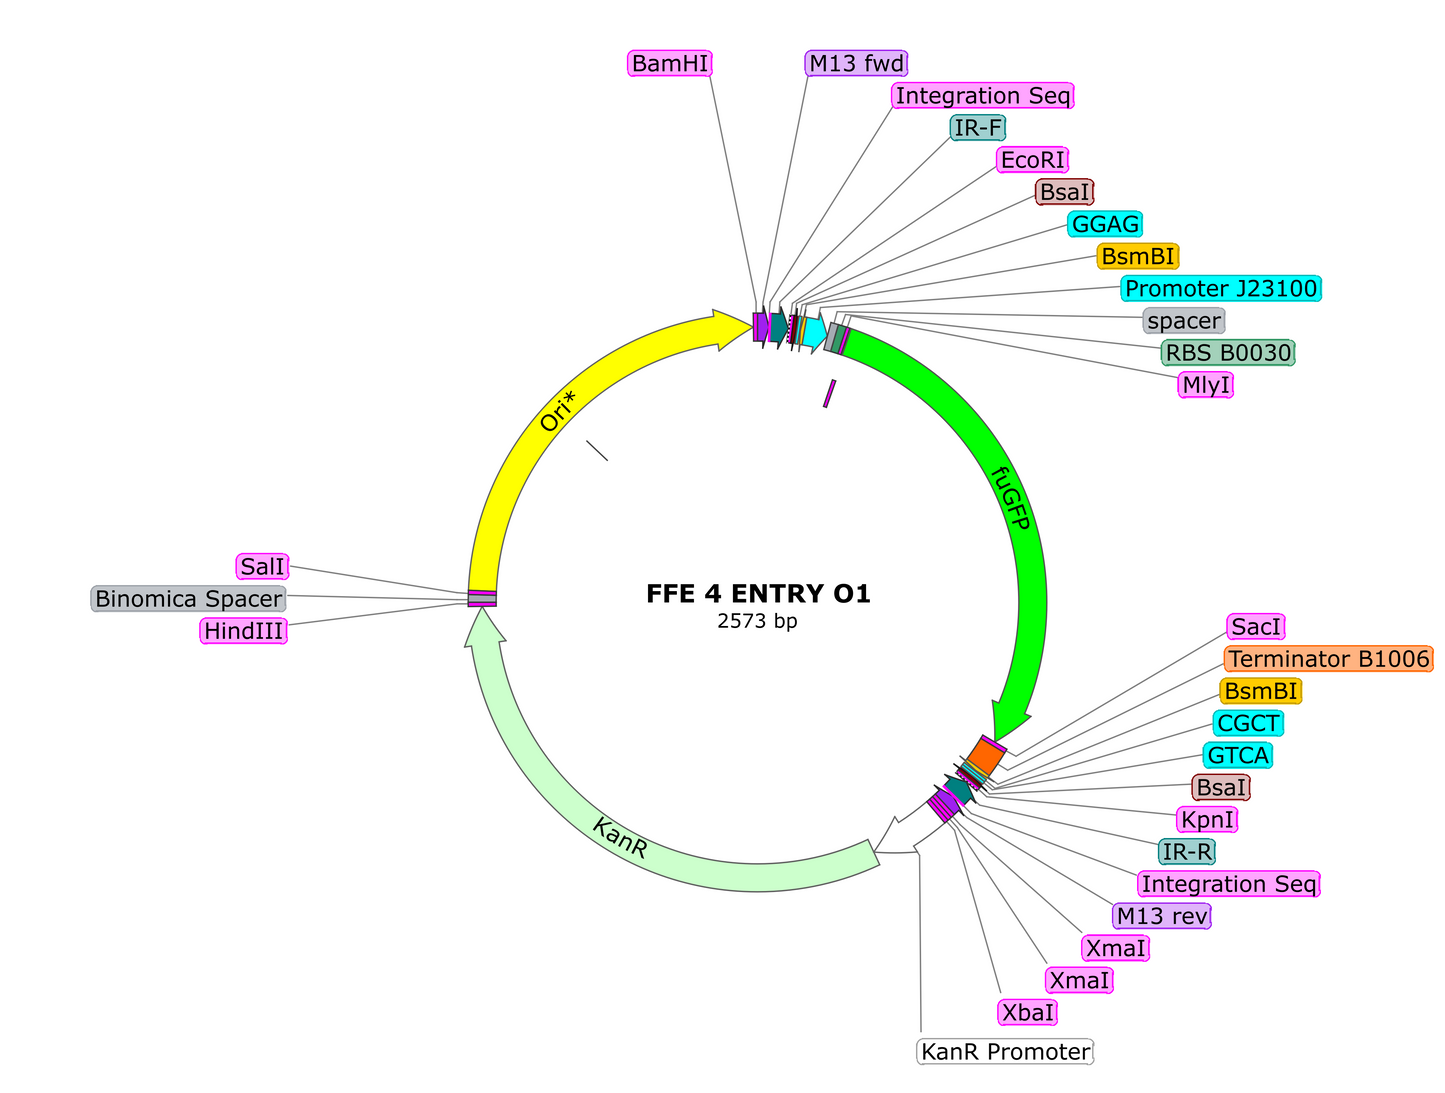
7. To chain an A1 TU with an A2 TU, prepare a Golden Braid reaction as follows:
-1uL of Entry Vector O1 *new entry vector*
-3uL of A1 TU plasmid carrying the TU you want first in line
-3uL of A2 TU plasmid carrying the TU you want second in line
-1uL 10x Cutsmart Buffer (NEB)
-1uL 10mM ATP
-0.5uL T4 DNA Ligase (NEB)
-0.5uL Esp3I Restriction Enzyme (NEB; cheaper isoschizomer of BsmBI)
Run the Golden Braid Construction reaction in your PCR machine overnight.
8. The following morning, transform 2.5uL of the reaction into 20uL of E. coli competent cells and plate on LB with 50mg/L Kanamycin. NOTE THE CHANGE IN ANTIBIOTICS. Incubate at 37C overnight.
9. The following morning, select non-fluorescent colonies for Colony PCR, miniprep the positives and send out for sequencing. If all looks good you should have TWO TU's cloned into a single O1 entry vector. This is now called a Golden Braid Module, Congrats on cloning your first module!
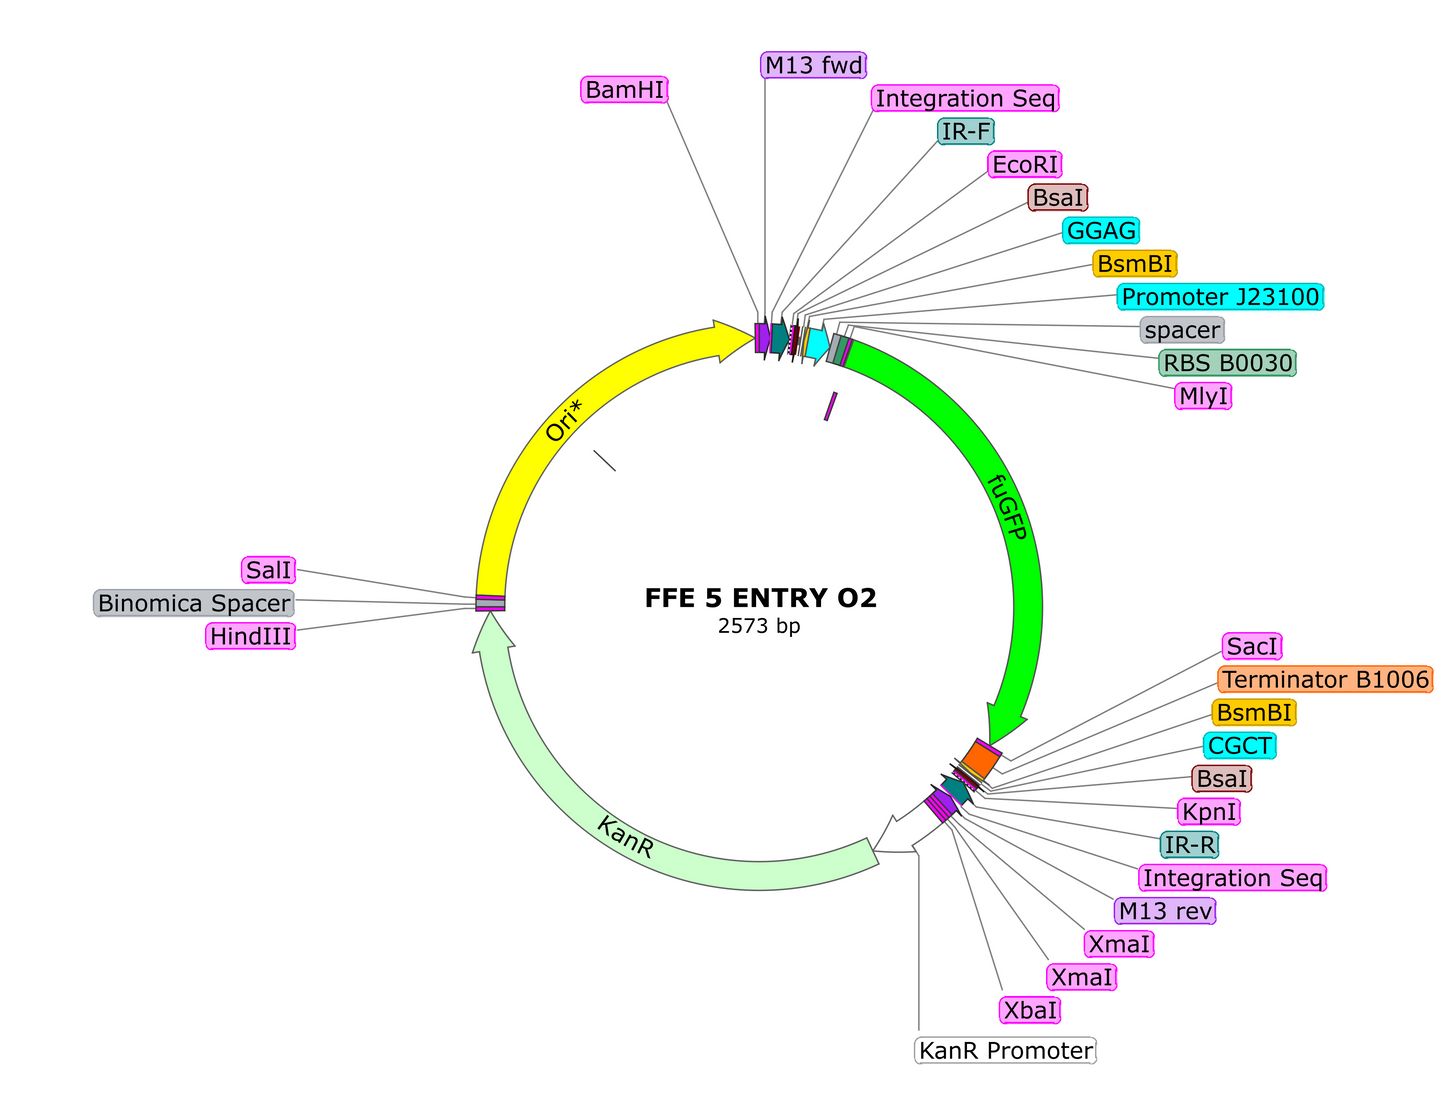
10. If you wish to continue adding to your module, first clone in a TU into the Entry Vector O2 plasmid, using the same process as cloning single parts into an A1 or A2 vector via BsaI. Once you have your desired TU cloned into the O2 plasmid, proceed to the next step.
11. To a PCR tube add the following:
-1uL of Entry Vector A1 *new entry vector*
-3uL of O1 TU plasmid carrying the TU you want first in line
-3uL of O2 TU plasmid carrying the TU you want second in line
-1uL 10x Cutsmart Buffer (NEB)
-1uL 10mM ATP
-0.5uL T4 DNA Ligase (NEB)
-0.5uL BsaI Restriction Enzyme (NEB)
Run the Golden Braid Construction program in your PCR machine overnight.
12. The following morning, transform 2.5uL of ligation product into 20uL of E. coli competent cells and plate on LB with 100mg/L Ampicillin. NOTE THE CHANGE IN ANTIBIOTICS YET AGAIN. The resulting colonies, if positive, will have TU1+TU2+TU3 all cloned contiguously into a single A1 plasmid. From this point on you can repeat the cycle continuously, adding a new TU or Module with each cloning cycle.
THAT IS THE HEART OF GOLDEN BRAID CLONING. Please see this link for design documents, sequence files, and other goodies. Check back often as I improve the content via user feedback.
Golden Braid Cloning Manual and Files
The plasmid is shipped pre-transformed in a safe non-pathogenic laboratory line of E. coli in an agar stab. Please store at 4C in a fridge or at room temp in the dark. DO NOT FREEZE. Properly stored unopened agar stabs have lasted well over 5 years with good recovery in my lab.
To maintain the plasmid in the E. coli it comes in, please use standard LB Agar with 50mg/L Kanamycin for UPD, O1, and O2 and use 100mg/L Ampicillin for the A1 and A2 plasmids. Incubate overnight at 37C. Please restreak when you would like to use the cells and only work with freshly grown well isolated colonies. Do not grow cells in liquid media directly as it will carry over stressed cells and lead to uneven colony sizes and poor growth performance. Only use fluorescent colonies for downstream minipreps. Any non-glowy colonies have lost their plasmid.
References:
GoldenBraid 2.0: A Comprehensive DNA Assembly Framework for Plant Synthetic Biology | Plant Physiology | Oxford Academic
Goldenbraid Home page
LIABILITY WAIVER
By purchasing products from New York Botanics, LLC dba "Sebastian's Biotech Bazaar", henceforth referred to as the "Seller", you, the "Purchaser", agree to the following terms:
1. Acknowledgment of Risk: You acknowledge that the purchase and use of the plasmids involve known and unanticipated risks, which could result in physical or chemical damage, and you understand such potential risks.
2. Assumption of Risk: You knowingly, voluntarily, and expressly waive any claim you may have against the Seller for any such damages sustained as a result of purchasing or using the plasmids.
3. Release and Waiver: You hereby voluntarily release, forever discharge, and agree to indemnify and hold harmless the Seller from any and all claims, demands, or causes of action which are in any way connected with your purchase or use of the plasmids.
4. Severability: You expressly agree that the foregoing release and waiver, assumption of risk, and indemnity agreement are intended to be as broad and inclusive as permitted by law, and that if any portion thereof is held invalid, it is agreed that the balance shall continue in full legal force and effect.
By purchasing this product, you acknowledge that you have read this release of liability and assumption of risk agreement, fully understand its terms, understand that you have given up substantial rights by agreeing to it, and agree to it freely and voluntarily without any inducement.
Share